kicad-learning-path
Diode Power Entry and 5 V Linear Regulator


A 9 V battery or 7.6 V to 12 V DC supply turned into a clean 5 V rail: a Schottky diode against reverse connection, an L7805 linear regulator, input and output capacitors, a power LED and four test points. Project 5 of my KiCad learning path: reverse-polarity protection, the linear regulator, capacitors that keep it stable, and heat.
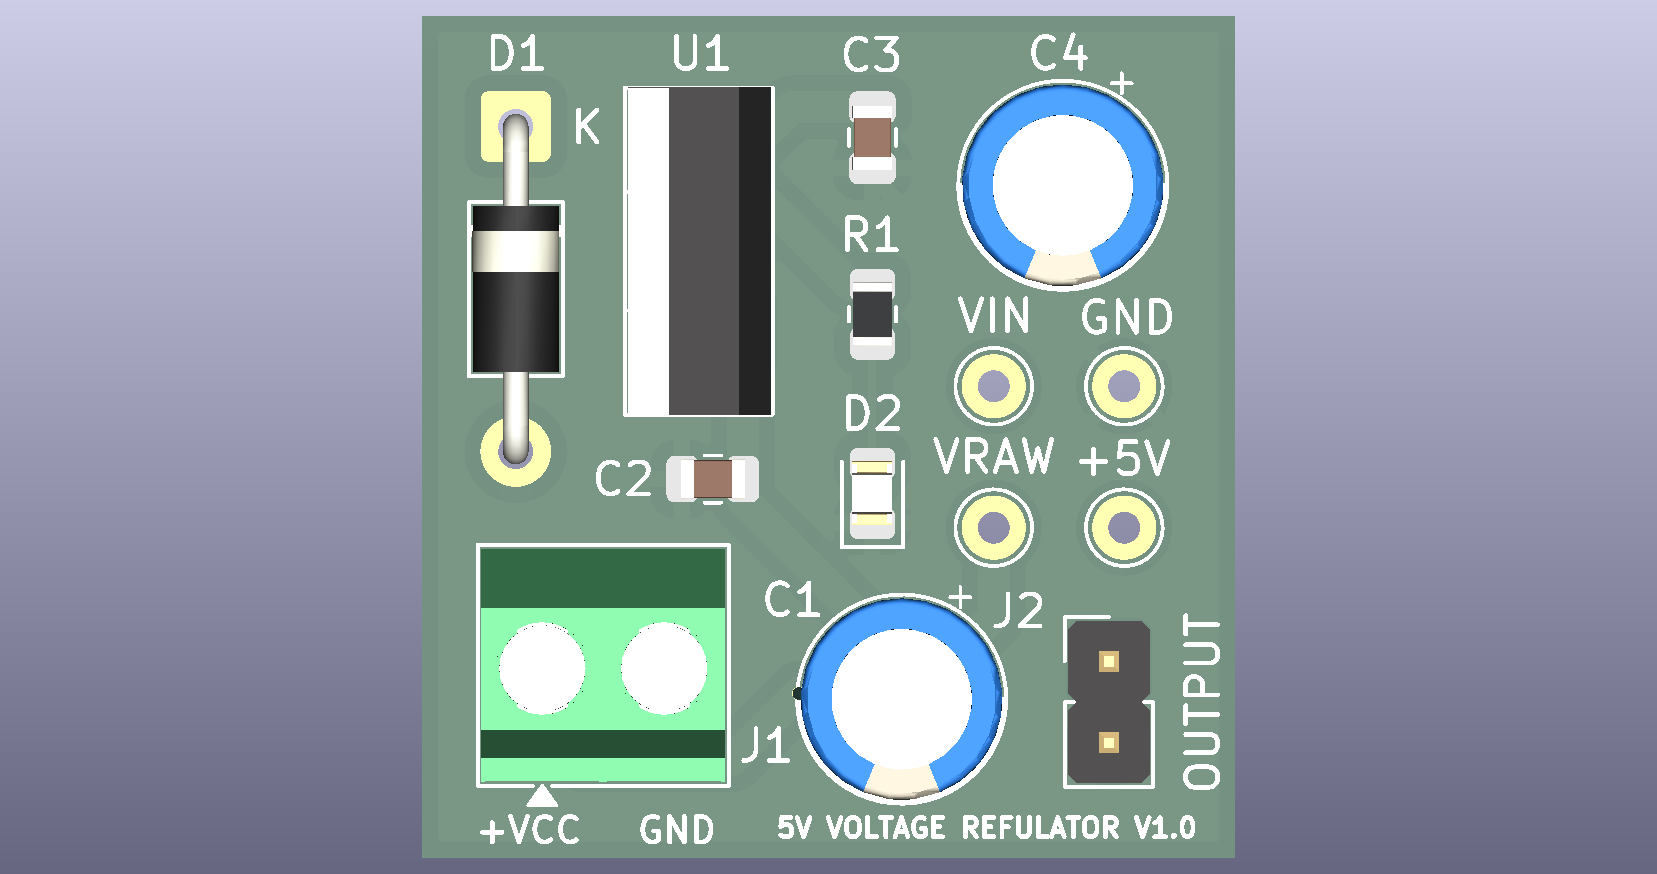
Table of contents
- Overview
- Key specifications
- Gallery
- Operating area and power budget
- How the circuit works
- Design calculations (summary)
- Purpose of each component
- Bill of materials
- Netlist
- Repository structure
- Getting started
- Testing
- Verification status
- Future improvements
- License
Overview
Every earlier board assumed a clean 5 V supply. This board makes one. Real power sources are not clean: batteries sag, bench supplies are set too high, and people plug them in backwards. This board handles all three.
| Section | Parts | What it demonstrates |
|---|---|---|
| Power entry | J1, D1 |
A series Schottky diode blocks a reversed connection, at the cost of a small voltage drop |
| Regulation | U1 |
A linear regulator turns any input from 7.6 V to 12 V into a steady 5 V, burning the difference as heat |
| Capacitors | C1 to C4 |
Bulk and high-frequency capacitors on the input and output |
| Indicator | R1, D2 |
A power LED that also provides the regulator’s minimum load |
| Measurement | TP1 to TP4 |
Probe points before the diode, after the diode, at the output, and ground |
New ideas compared with Project 4:
- Reverse-polarity protection and the cost of a diode drop
- Linear regulation, dropout voltage and efficiency
- Heat: power dissipation, thermal resistance, junction temperature and heatsinks
- Electrolytic and ceramic capacitors working together, and electrolytic polarity
- The regulator’s minimum load current
- A wider net class (1.0 mm) for supply tracks
- A voltage and power budget in the documentation
The full engineering write-up (theory, derivations, thermal analysis, KiCad configuration, layout rules, test procedure) is in docs/DESIGN_NOTES.md.
Key specifications
| Parameter | Value |
|---|---|
| Input voltage | 7.6 V to 12 V DC (9 V battery nominal), at screw terminal J1 |
| Reverse-polarity protection | 1N5819 Schottky, blocks up to 40 V in reverse |
| Output voltage | 5 V, within 4.75 V to 5.25 V over all line, load and temperature conditions (datasheet) |
| Output current, free air | 300 mA with up to 10 V input at 40 °C ambient |
| Output current, with heatsink | 500 mA with up to 12 V input and a clip-on heatsink of 18 °C/W or better |
| Minimum load | 5 mA, met by the power LED (9.1 mA) |
| Regulator heat | 1.17 W at 9 V in and 300 mA out (junction 83 °C at 25 °C ambient) |
| Efficiency | 54 % at 9 V in and 300 mA out, 41 % at 12 V in and 300 mA out |
| Board layers | 2 |
| Board thickness | 1.6 mm |
| Copper weight | 1 oz (35 µm) |
| Board size | 70 × 45 mm |
| Components | 14 (10 circuit parts and 4 test points) |
| Pads / nets | 25 / 5 |
| Design tool | KiCad 10.0.x |
| ERC / DRC | 0 errors / 0 errors |
Gallery
Schematic
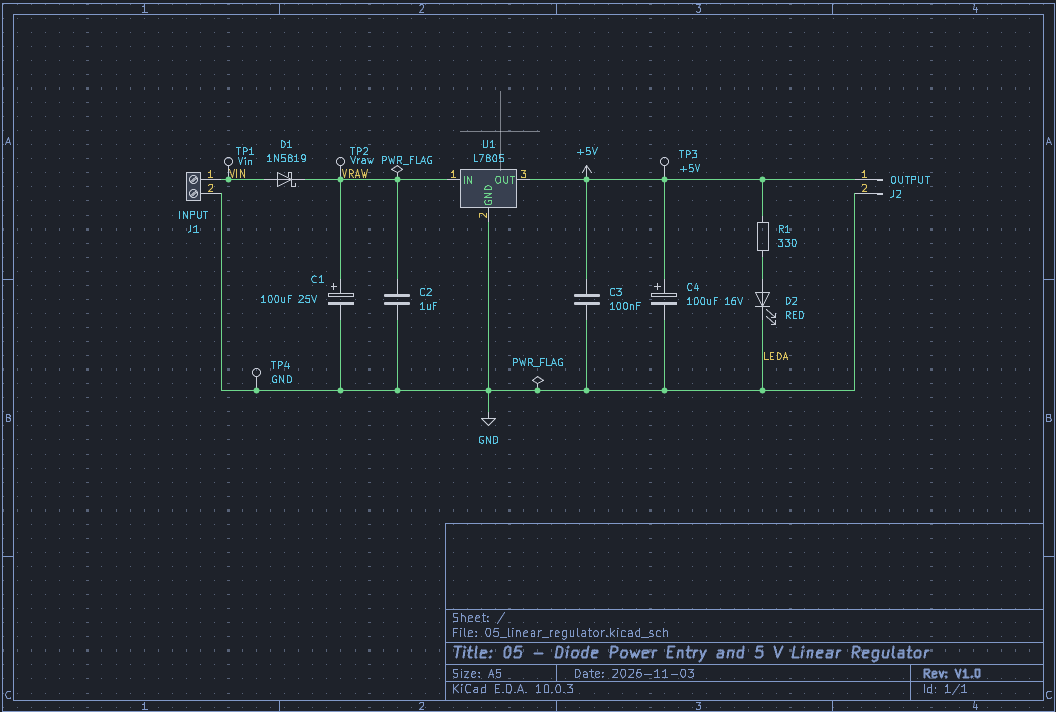
Full-size PDF: docs/schematic.pdf
PCB layout
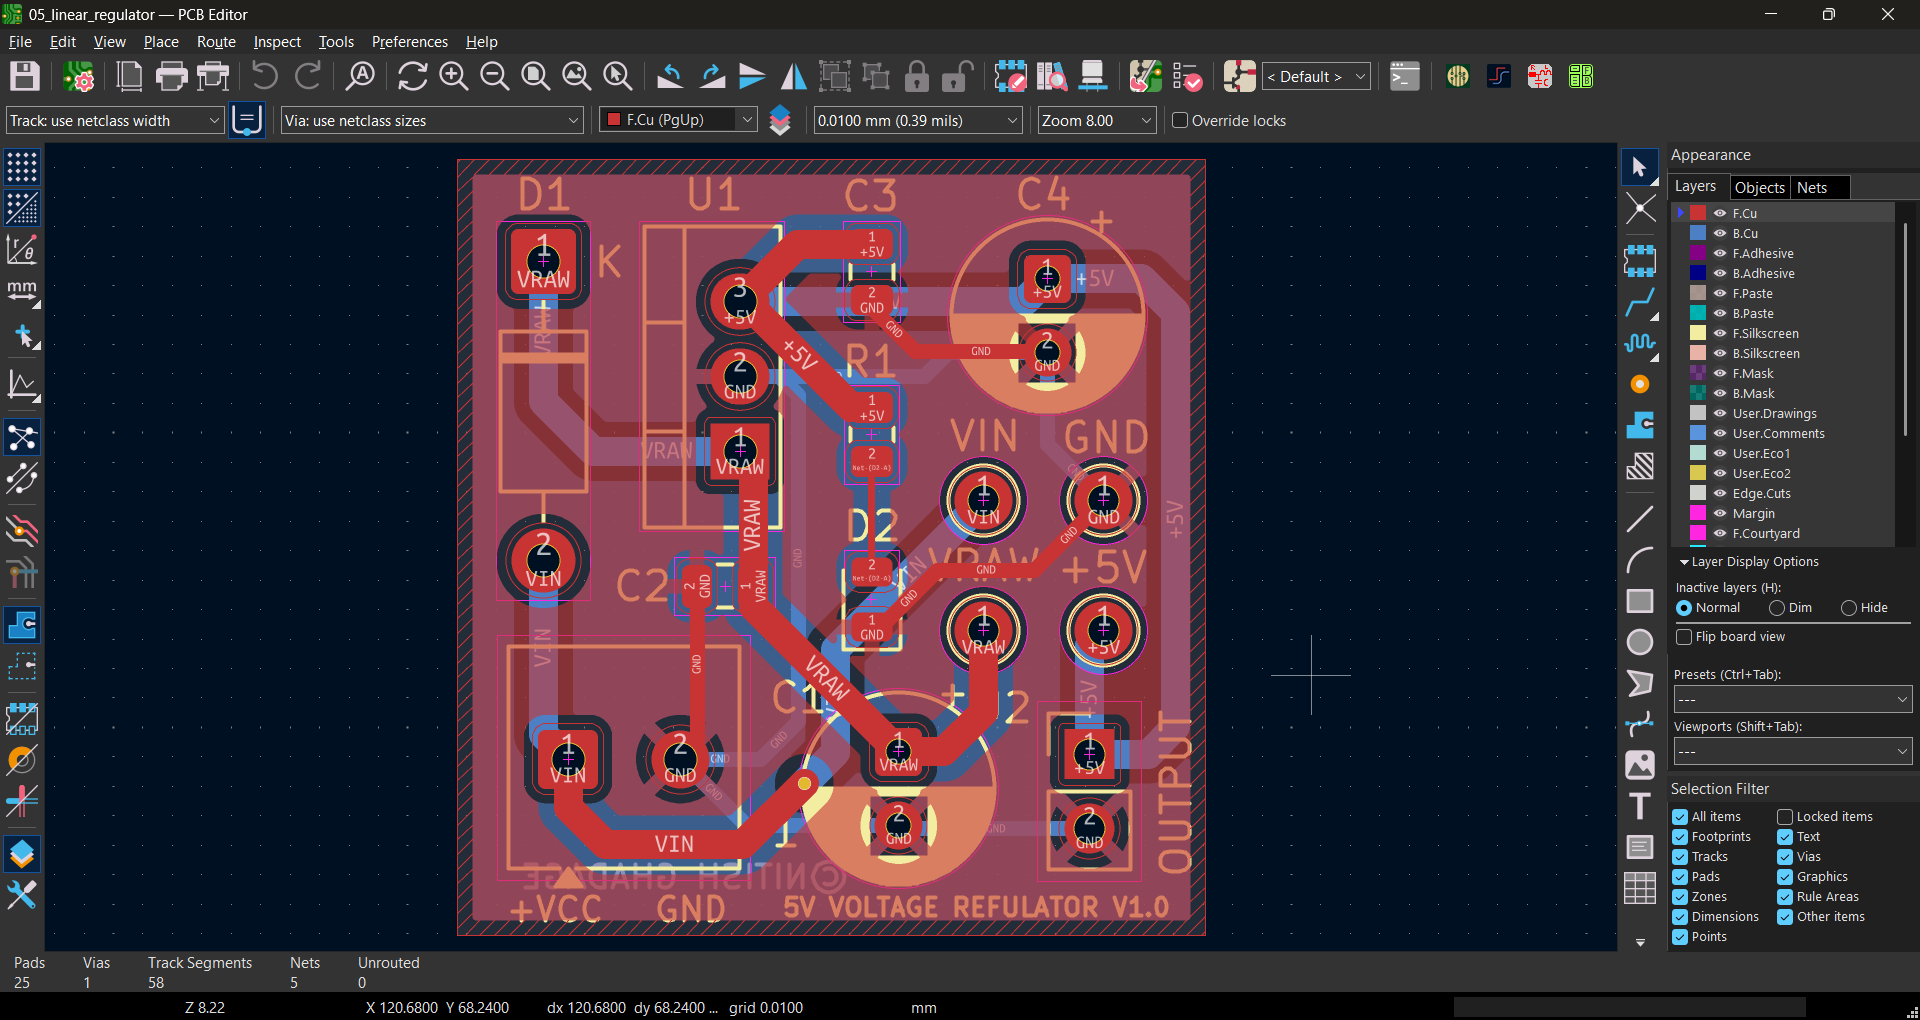
3D views
| Top | Bottom |
|---|---|
|
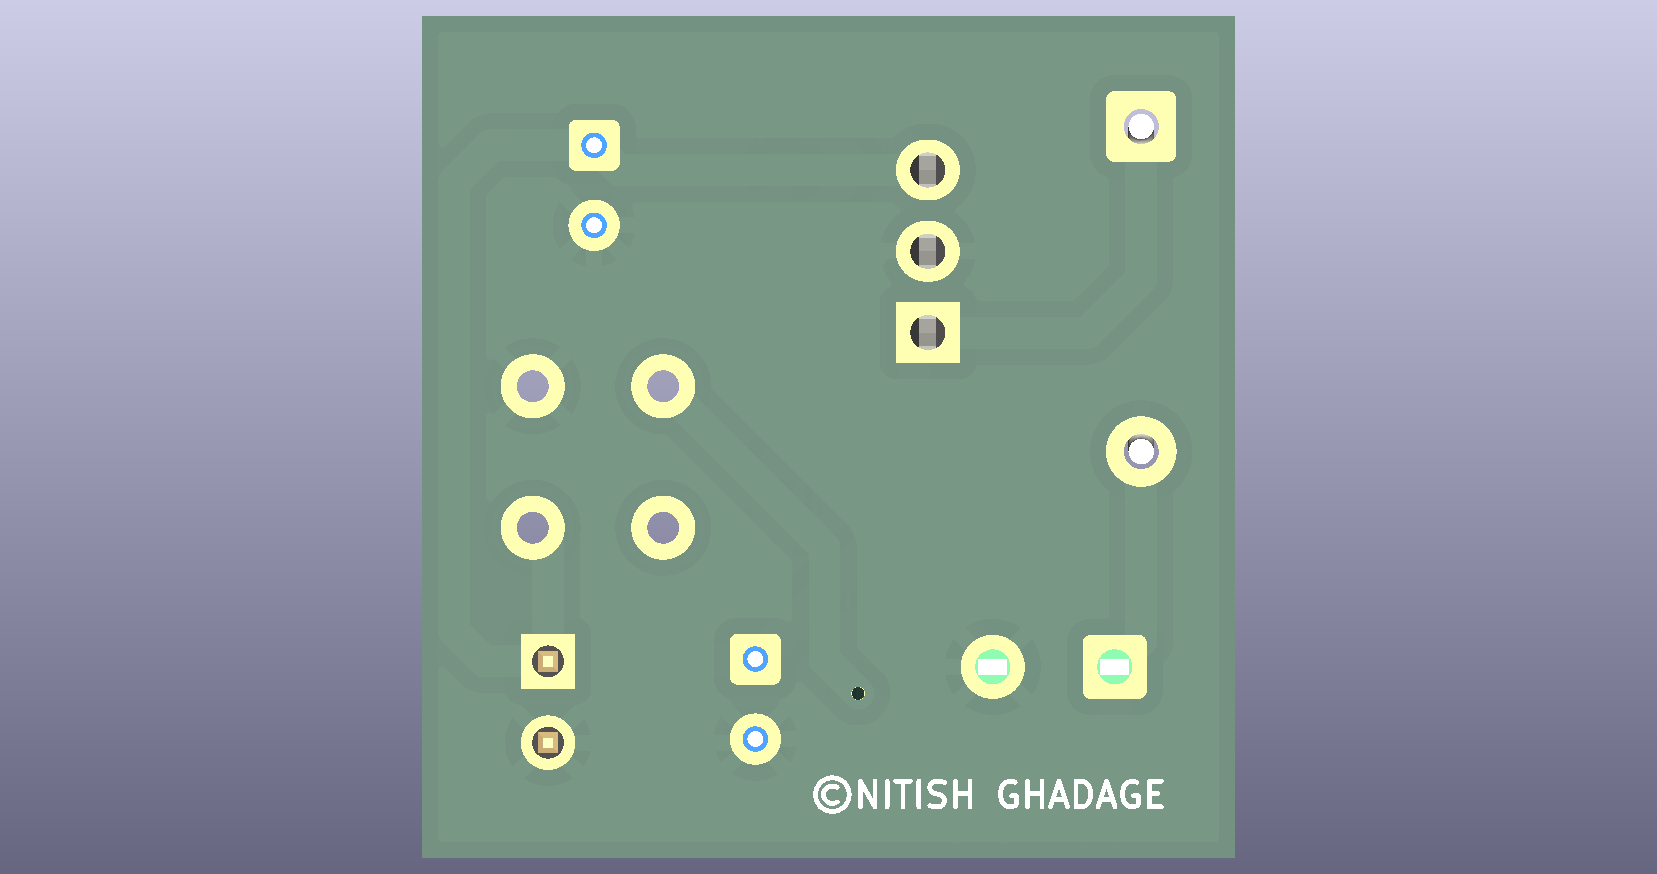 |
Operating area and power budget
Dropout and thermal limits
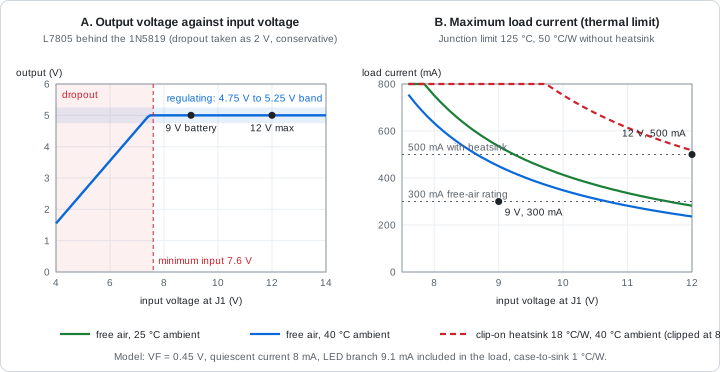
| Plot | Reading |
|---|---|
| A. Output against input | The output stays at 5 V while the input is high enough. Below about 7.6 V at J1 the regulator is in dropout and the output falls with the input |
| B. Maximum load against input | The higher the input voltage, the more heat the regulator must burn for the same current, so the allowed current falls. A heatsink raises the limit |
Where the power goes
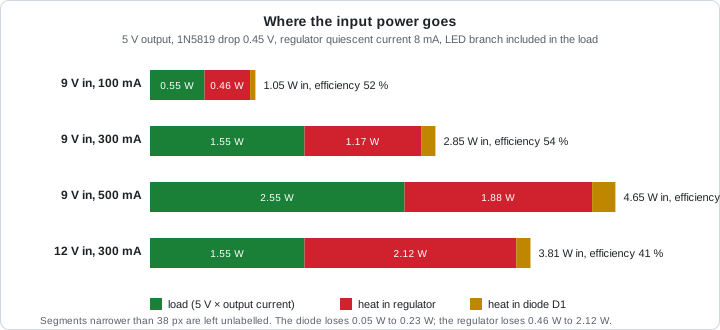
A linear regulator wastes the difference between input and output as heat. From 9 V to 5 V it can never be better than 56 % efficient, and from 12 V to 5 V never better than 42 %. At 9 V and 300 mA the regulator burns 1.17 W, while the load receives 1.55 W.
How the circuit works
 J1+ ── TP1 ── D1 (1N5819) ── TP2 ──┬──────────┬── U1 IN ─── U1 OUT ──┬─────────┬────────┬── TP3 / J2+
                                   C1         C2                    C3        C4       R1 ─ D2 (LED)
                                 100 µF       1 µF                 100 nF    100 µF       │
 J1− ── TP4 ───────────────────────┴──────────┴────── U1 GND ───────┴─────────┴────────┴── J2−
- Reverse polarity. With the supply connected correctly,
D1conducts and drops about 0.45 V. If the supply is reversed,D1is reverse-biased and blocks it, so nothing downstream sees a negative voltage. - Input capacitors.
C1(100 µF) is a reservoir that supplies sudden current demands.C2(1 µF ceramic) sits at the regulator’s input pin and handles fast changes. The datasheet asks for at least 0.33 µF at the input, with the shortest possible leads. - Regulation.
U1compares its output with an internal reference and adjusts an internal pass transistor to hold 5 V. The pass transistor drops the surplus voltage multiplied by the current, and that power becomes heat. - Output capacitors.
C3(100 nF) andC4(100 µF) improve the response to load changes. The L7805 is stable without an output capacitor, but the datasheet notes that one improves transient response. - Minimum load. The regulator needs at least 5 mA of load to regulate properly.
R1and the power LED draw 9.1 mA, so it is always satisfied.
The metal tab of the TO-220 package is connected to ground (pin 2). It is the part that carries heat to a heatsink.
Design calculations (summary)
Minimum input voltage. The regulator needs its input to be at least 7 V (the datasheet’s lowest test condition, equal to 5 V plus the 2 V dropout), and the diode takes up to 0.6 V:
\[V_{in,min} = 7.0\ \text{V} + 0.6\ \text{V} = 7.6\ \text{V}\]Regulator power:
\[P_{reg} = (V_{raw} - V_{out}) \times I_{out} + V_{raw} \times I_q \qquad V_{raw} = V_{in} - V_F\]For 9 V in, 300 mA load (plus 9.1 mA for the LED), 0.45 V diode drop and 8 mA quiescent current:
\[P_{reg} = (8.55 - 5.0) \times 0.309 + 8.55 \times 0.008 = 1.17\ \text{W}\]Junction temperature (TO-220 in free air, 50 °C/W, 25 °C ambient):
\[T_J = T_A + P_{reg} \times R_{\theta JA} = 25 + 1.17 \times 50 = 83\ ^\circ\text{C}\]The datasheet’s operating limit is 125 °C.
| Operating point | P_reg |
T_J at 25 °C ambient |
T_J at 40 °C ambient |
Efficiency |
|---|---|---|---|---|
| 9 V in, 100 mA | 0.46 W | 48 °C | 63 °C | 52 % |
| 9 V in, 300 mA | 1.17 W | 83 °C | 98 °C | 54 % |
| 9 V in, 500 mA | 1.88 W | 119 °C | 134 °C (over the limit) | 55 % |
| 12 V in, 300 mA | 2.12 W | 131 °C (over the limit) | 146 °C (over the limit) | 41 % |
| 12 V in, 500 mA | 3.43 W | needs a heatsink of 18 °C/W or better | 41 % |
The full derivation, tolerance analysis, heatsink selection and capacitor reasoning are in docs/DESIGN_NOTES.md.
Purpose of each component
| Ref | Value | Purpose |
|---|---|---|
J1 |
2-pin screw terminal, 5.08 mm | Input from a 9 V battery clip or a bench supply (pin 1 +, pin 2 −) |
D1 |
1N5819 Schottky, 40 V, 1 A | Blocks a reversed supply. Chosen over a silicon diode for its lower drop (0.6 V maximum at 1 A) |
U1 |
L7805CV, TO-220 | Fixed 5 V linear regulator, up to 1.5 A, with thermal shutdown and current limiting |
C1 |
100 µF, 25 V electrolytic | Input reservoir: supplies sudden current demands and smooths the supply. Polarised |
C2 |
1 µF, 50 V X7R ceramic | Input high-frequency capacitor at the regulator pin. Meets the datasheet’s 0.33 µF minimum even after ceramic DC-bias loss |
C3 |
100 nF, 50 V X7R ceramic | Output high-frequency capacitor (the datasheet’s test value) |
C4 |
100 µF, 16 V electrolytic | Output reservoir: improves response to load steps. Polarised |
R1 |
330 Ω | Sets the power LED current to 9.1 mA |
D2 |
Red LED, 0805 | Power indicator, and the regulator’s minimum load |
J2 |
2-pin header | 5 V output (pin 1 +5V, pin 2 GND) |
TP1 |
Test point | VIN: input before the diode |
TP2 |
Test point | VRAW: regulator input, after the diode |
TP3 |
Test point | +5V: regulated output |
TP4 |
Test point | GND: reference |
Bill of materials
| Ref | Qty | Value | Footprint | Description |
|---|---|---|---|---|
J1 |
1 | Screw_Terminal_01x02 | TerminalBlock_bornier-2_P5.08mm |
2-pin screw terminal, supply in |
J2 |
1 | Conn_01x02_Pin | PinHeader_1x02_P2.54mm_Vertical |
2-pin header, 5 V out |
D1 |
1 | 1N5819 | D_DO-41_SOD81_P10.16mm_Horizontal |
Schottky diode, 40 V, 1 A |
U1 |
1 | L7805CV | TO-220-3_Vertical |
5 V linear regulator |
C1 |
1 | 100 µF, 25 V | CP_Radial_D6.3mm_P2.50mm |
Electrolytic capacitor |
C2 |
1 | 1 µF, 50 V, X7R | C_0805_2012Metric |
Ceramic capacitor |
C3 |
1 | 100 nF, 50 V, X7R | C_0805_2012Metric |
Ceramic capacitor |
C4 |
1 | 100 µF, 16 V | CP_Radial_D6.3mm_P2.50mm |
Electrolytic capacitor |
R1 |
1 | 330 Ω | R_0805_2012Metric |
LED resistor, 1 % |
D2 |
1 | RED | LED_0805_2012Metric |
Red LED |
TP1 to TP4 |
4 | TestPoint | TestPoint_THTPad_D2.0mm_Drill1.0mm |
Through-hole test points |
| Optional | 1 | Clip-on TO-220 heatsink, 18 °C/W or better | n/a | For loads above 300 mA or inputs above 10 V |
The same list is available as CSV in fabrication/bom.csv.
Netlist
| Net | Connections |
|---|---|
VIN |
J1-1, D1 anode, TP1 |
VRAW |
D1 cathode, C1 +, C2-1, U1-1 (IN), TP2 |
+5V |
U1-3 (OUT), C3-1, C4 +, R1-1, J2-1, TP3 |
GND |
J1-2, U1-2 (GND), C1 −, C2-2, C3-2, C4 −, D2 cathode, J2-2, TP4 |
LEDA |
R1-2, D2 anode |
Repository structure
This project lives in the 05-linear-regulator/ folder of the kicad-learning-path repository.
05-linear-regulator/
├── README.md
├── 05_linear_regulator.kicad_pro     KiCad project file
├── 05_linear_regulator.kicad_sch     Schematic
├── 05_linear_regulator.kicad_pcb     PCB layout
├── fabrication/
│   ├── gerbers/                      Gerber and drill files
│   ├── 05_linear_regulator_gerbers.zip
│   └── bom.csv
└── docs/
    ├── DESIGN_NOTES.md               Full engineering documentation
    ├── schematic.pdf
    ├── images/                       Operating area, power budget, screenshots, renders
    └── reports/                      ERC and DRC reports
Getting started
Open the project
- Install KiCad 10.
- Clone or download this repository.
- Open
05-linear-regulator/05_linear_regulator.kicad_proin KiCad. The project uses only the standard KiCad libraries.
Rebuild the manufacturing files
- Open the PCB editor and run Inspect → Design Rules Checker. It should report 0 errors.
- Open File → Fabrication Outputs → Gerbers and Generate Drill Files. The exact settings are listed in
docs/DESIGN_NOTES.md. - Zip the output folder.
Order the PCB
Upload fabrication/05_linear_regulator_gerbers.zip to a PCB fabricator. Suggested options for a low-cost fab: 2 layers, 1.6 mm, 1 oz copper, HASL finish.
Testing
Safety first: the regulator gets hot (about 77 °C at its case when delivering 300 mA from 9 V) and the test load resistors get hot too. Step-by-step measurements, expected values, test loads and a troubleshooting table are in docs/DESIGN_NOTES.md. In short: test the reversed connection first with a current-limited supply, then apply 9 V and check TP2 (about 8.5 V) and TP3 (about 5.0 V), then load the output step by step.
Verification status
| Check | Result |
|---|---|
| Electrical Rules Check (ERC) | 0 errors |
| Design Rules Check (DRC) | 0 errors, 0 unrouted nets |
| Gerber viewer check | Passed |
| Physical board built and tested | Not yet |
Reports: docs/reports/
Future improvements
- Add a protection diode across the regulator if you attach very large output capacitors
- Replace the series diode with a P-channel MOSFET for a much smaller voltage drop (see Project 12)
- Try a low-dropout regulator and compare its efficiency at 7.6 V
- Add a fuse or resettable fuse at the input
- Add mounting holes and a bolt-on heatsink position
License
Released under the MIT License.
Author: Nitish Ghadage · GitHub